 Delorion
Change user details
Update selected accounts, combine supported changes and review deletion before it is applied.
Applies to userXpress 1.9.5.50
On this page
Select the accounts in the Global User Table and verify their system/client values. A bulk change can affect users in several clients, so first use a small selection when checking an unfamiliar operation.
Change an individual attribute
Open Assign in the toolbar and choose the attribute. Available actions include alias, email address, reference user, security policy, company name, work center and name information.
Enter the new value in the action’s dialog, check the selection and confirm. Review the operation result for each account. A value that is valid in one client may not be valid in another.
For SNC names, follow the SNC assignment guide.
Assign an alias
Choose Assign → Alias.., enter the alias and choose OK. Check the result for each selected account. An alias must not conflict with another user in the same client; assigning one literal alias to several different users can produce duplicate-alias failures. Select only the intended account or matching account across clients, rather than using one alias for unrelated people.
Assign or remove email addresses
Choose Assign → Email.. and select the required option:
| Option | Use |
|---|---|
| Email Address | Enter one literal email address. This choice is disabled when the selection contains several different user IDs. |
| Custom | Build addresses from first name, first initial or last name, a separator and the domain. Check that the selected users have the required name data. |
| UserID@address | Use each user’s ID with the address suffix you supply. |
| Copy address from Alias field | Copy each user’s alias into the email field. Check that the aliases really contain the intended addresses. |
| Remove Email Address | Remove the current email address from the selected users. |
Review the selected construction and domain before choosing OK. The example in this dialog uses sample names; it is not a preview of every selected user’s final address. Check the actual resulting addresses, especially when using initials, missing name data or aliases. This action updates account data; it does not send a verification email.
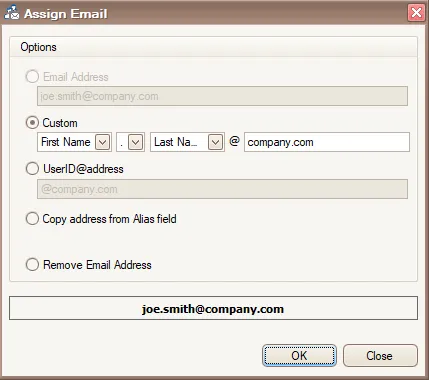
Custom email construction shows an example address before you confirm.
Assign a reference user or security policy
Choose Assign → Reference User to select a reference user shared by the selected clients. The option Remove existing roles & profiles from user(s) also removes the users’ existing role and profile assignments. Leave it clear unless that access change is intended and approved.
Choose Assign → Security Policy to select a policy common to the selected clients. If a value is not offered, check that it exists in every target client. Choose OK only after checking the target users and intended policy or reference user, then inspect the results.
Update organization and name details
- Assign → Company Name offers company names common to the selected clients. Select the users to update—not the companies in another table—then choose the required company and OK.
- Assign → Work Center updates the work-center field shown on the user’s SAP address details.
- Assign → Name Information updates the person/name details. Check whether the same values should apply to every selected account before confirming.
Apply several changes together
- Select the users.
- Choose Multiple Change.
- Enable only the changes you intend to apply and supply their values.
- Review the target users and selected changes before confirming.
- Inspect the results for failures or differences between clients.
The choices shown for some fields, including groups, depend on the values available across the selected systems. If the required value is absent, check the selected clients and their configuration.
Manage parameter IDs
Use Parameter ID for the selected users. The choice between merging, replacing and removing matters as much as the ID/value list. Follow Manage parameter IDs for the four modes and their consequences.
Delete users
Deletion removes SAP accounts and can affect audit and retention requirements. Follow your organization’s account-retirement policy before using this action.
- Select the accounts and choose Delete.
- Review the deletion list. Clear the delete selection for any account that must remain.
- Enter the confirmation characters requested by the dialog.
- Select Delete only after checking the final target list.
- Review the per-account results.
Cancel before confirming if the selection is wrong. Do not assume deletion can be undone. If account access should end while the account must be retained, use the access and validity changes approved by your SAP administrator.