 Delorion
Update role assignments
Add and remove roles for selected users across SAP clients, with common or client-specific changes.
Applies to userXpress 2.0.0.0
Download PDF
- This pageUpdate role assignments
- This sectionRoles
- Full manualuserXpress documentation
On this page
Use Roles → Update Role Assignment when selected users need the same role changes. For example, add a new reporting role and remove the role it replaces across several clients in one operation.
Each row in the Roles tab describes an addition or removal. Its system and client determine which selected users receive that change. You can combine changes for all selected clients with changes for one client.
Prepare the changes
The dialog uses the role lists already loaded in the Global Role Table for your connected clients.
- In the Global User Table, select the target accounts using their row checkboxes.
- Choose Roles → Update Role Assignment. Wait for Getting common and unique Roles to finish.
- In an empty row on the Roles tab, choose System:
- Choose a named system, then choose Client, to affect selected users in that client.
- Choose *ALL* to affect selected users in every client represented by your selection. This choice is available when the selection spans several clients.
- Choose Role Name from the list. For *ALL*, the list contains names present in every selected client.
- Choose the action in the icon column: the green plus adds the role, and the red minus removes it. New rows default to Add after you choose a system.
- For an addition, set Valid From and Valid To. Choosing a role initially sets today and 31 December 9999. Change these dates for a scheduled start or temporary assignment.
- Repeat for each change. Leave Change all on first row change clear when rows need different actions or destinations.
- Choose Change Roles to apply the populated rows. The dialog switches to Results.
Change Roles uses all populated rows in the proposal. Row checkboxes select rows for Clear Selected. To exclude a proposed change, remove its row before applying.
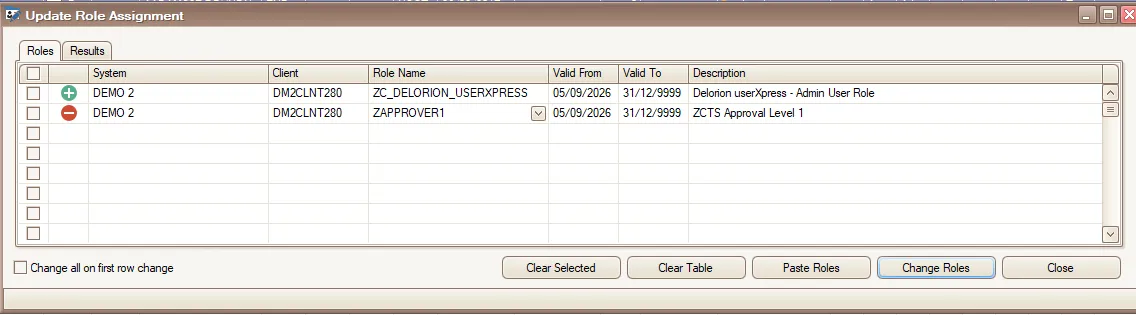
The icon beside each row selects Add or Remove.
How each change applies
userXpress reads the selected users’ assignments before applying your changes. It carries forward the existing role names and validity periods, adds the requested rows and removes the requested entries.
- Add: supplies the named role with the dates entered in that row.
- Remove: removes a matching role entry by name. The row’s dates do not select a particular assignment period.
- *ALL*: applies the row to every selected user, using the role with that name in each user’s own client.
- Named system and client: applies the row only to selected accounts in that destination.
For example, suppose you selected users in clients 100 and 200. You can add Z_DEMO_REPORT with *ALL* and add Z_DEMO_APPROVE only in client 200. The client-100 users receive the reporting-role change. The selected client-200 users receive both changes. These names are illustrative—choose your own roles from the lists.
If a role has several assignment periods, one Remove row removes one matching entry. To edit or remove a particular period, use the Mass Changes role worksheet, which describes the complete resulting assignment list.
Change several rows together
Select Change all on first row change when populated rows need the same action or destination. Changing these fields in the first row copies the corresponding value to the other populated rows:
- Add/Remove icon
- System
- Client
The role names and validity dates remain individual. Clear the checkbox before making a change that should affect only the first row.
Changing System clears that row’s Client. Choose the destination client again before applying a client-specific change.
Paste role names
Use Paste Roles when you already have a list in a spreadsheet. Pasting starts at the first proposal row and fills subsequent rows.
- Copy one column of role names without a heading.
- In Update Role Assignment, choose Clear Table if you want to replace an earlier proposal.
- Choose Paste Roles, or press Ctrl+V in the role table.
- Set the required Add/Remove action, System, Client and dates for the pasted rows.
Pasted roles start as additions. With several selected clients, their initial system is *ALL*. With one selected client, that client is used. Choose the specific destination for any role that is not common to all selected clients.
The Description column identifies role names that could not be found. Correct those rows by selecting the system, client and role from the lists. For text copied from an editor, include a line break after the last role name so that the final entry is read.
To remove rows from the proposal, select their checkboxes and choose Clear Selected or press Delete. Clear Table empties the entire proposal. These controls edit what you are preparing to apply.
Read the results
The Results tab identifies System, SID, Client, User and Message for each response. One user can have several messages. The icon distinguishes success, warning and error responses.
At completion, the status reads Role assignment is complete, Not all role assignment changes completed successfully or Role assignment was cancelled.
- SKIPPED: none of the proposal rows applied to that user’s client.
- SAP error: read the message for the affected user and client. Successful changes for other users remain applied.
- Cancelled before this user was processed: the account had not started when you stopped the operation.
For a retry, close the dialog and select the affected accounts in the Global User Table. If the error leaves the outcome uncertain, open Role Assignment to see which assignments reached SAP before preparing the remaining changes. Each new Change Roles run replaces the previous Results list.
Stop an operation
Choose Close while changes are running to request cancellation. Active account operations finish, and accounts that have not started are skipped. The dialog remains open so you can read Results. Choose Close again when processing has stopped.