 Delorion
Update accounts from a workbook
Export existing SAP accounts, prepare individual changes in a workbook, compare them with SAP and apply the updates.
Applies to userXpress 2.0.0.0
Download PDF
- This pageUpdate accounts from a workbook
- This sectionUsers
- Full manualuserXpress documentation
On this page
Use Mass Changes when each account needs different values. For example, extend contractors’ accounts to different end dates, assign individual cost centers or replace each person’s role assignments from a prepared list.
The workflow has three stages: export the accounts, edit the workbook, then review and apply its changes. Review Changes compares the workbook with SAP and shows the differences before Apply Changes becomes available.
For the same combination of values across all selected accounts, use Multiple Change.
Export the accounts
- In the Global User Table, select the accounts to update.
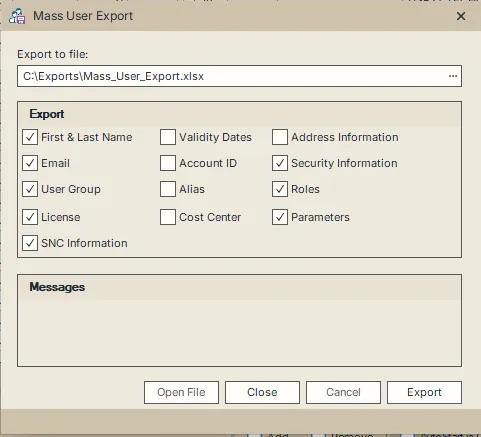
- Choose Users → Change → Mass → Mass Changes → Export Selected Users. The Mass User Export dialog opens.
- Choose the properties to include. Email, Alias and SNC Information start selected. Clear any categories you do not need and select the ones you intend to update.
- In Export to file:, use the proposed
Mass_User_Export.xlsxfile on your desktop or choose another path with the browse button. - Choose Export. userXpress reads the selected accounts from SAP and creates the workbook.
- When Messages shows Done, choose Open File to open the workbook in the associated spreadsheet application.
The workbook contains a MassUserExport worksheet with one row per account. Roles and Parameters are added as separate worksheets when you select those export categories. Some fields have drop-down lists with choices for that row’s SAP client.
See Workbook fields and assignment rules for the properties included by each category.
To stop an export, choose Cancel and confirm Yes. Wait for the cancellation result before starting another export.
Prepare the updates
- On MassUserExport, retain the
System,SID,ClientandUser_IDvalues that identify each account. - Edit the fields to their intended values. Retain existing values in fields that should stay the same.
- Remove an account’s row if it is outside this update. Remove its corresponding rows from Roles and Parameters too.
- If you are changing roles or parameters, prepare their complete desired lists as described below.
- Save the workbook as
.xlsx.
Keep the worksheet names and column headings. Use the cell drop-downs where supplied. The lists reflect the SAP values available at export time, and userXpress validates the relevant choices again during review.
An empty cell usually requests removal of the existing value. Blank account-validity dates, Security_Policy and License instead retain their existing values. The field reference identifies these exceptions.
Use Mass User Export to prepare this workbook. The separate Mass User Create workbook defines new accounts and has a different layout.
Example: different contract end dates
Export the two contractors’ accounts with Validity Dates selected. On MassUserExport:
- Set
Valid_Toto31/12/2027for the first contractor. - Set
Valid_Toto30/6/2028for the second contractor. - Retain the other exported values.
Save the file. During import, select Validy Dates under Properties to change and clear the other categories.
Roles and parameters describe the complete result
When Roles is enabled during import, each account’s rows on Roles become its desired direct role assignments. Keep every assignment that should remain, add the new ones and remove those to withdraw.
Parameters works the same way for the account’s parameter IDs and values. Keep every parameter that should remain in the resulting list.
If an account remains on MassUserExport but has no rows on an enabled related worksheet, its desired list is empty. Applying that change clears its direct roles or parameters. To preserve that category for the whole import, clear Roles or Parameters under Properties to change.
See Roles and Parameters for the exact headings and examples.
Import and review
Connect the SAP clients named in the workbook before reviewing it.
- Open Users → Change → Mass → Mass Changes → Import User Updates. The Mass User Update window opens.
- Choose Open File, or use the browse button beside Import from file:, and select the saved workbook. The Users tab shows its account rows.
- Under Properties to change, clear every category that should remain unchanged. Categories with supported columns or related worksheets are selected automatically when the file loads.
- Choose Review Changes. userXpress reads the SAP values, validates the selected fields and compares them with the workbook.
- On Changes, read the Field, Current SAP Value and Workbook Value for each proposed change. System, SID, Client and User identify its target.
- Open Messages for accounts that could not be validated or compared. Those accounts are excluded from the prepared update.
The status area reports how many accounts require changes, already match or could not be compared. Accounts that already match are omitted from the update. If no accounts need changes, Review Changes remains available instead of Apply Changes.
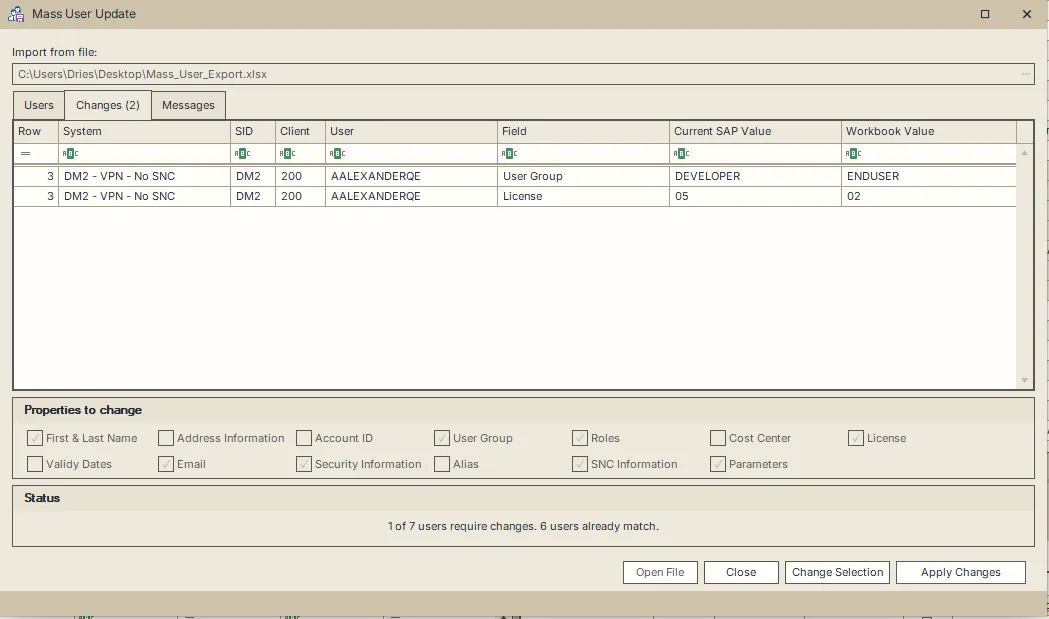
The preview proposes changes to two fields for one account: User Group and License. The other six accounts already match the workbook.
The preview is read-only. To revise the properties, choose Change Selection, select the categories again and choose Review Changes. Change Selection restores the automatic selections for the loaded workbook, so clear unwanted categories again.
To revise values, choose Change Selection, edit and save the workbook, then load it again with Open File. Review the newly loaded file before applying it.
Apply the prepared changes
Choose Apply Changes to apply the differences shown by the review. The prepared account list defines the update scope.
The status area reports Processed n of total users, followed by the refresh of the affected SAP clients. The Users tab displays Result and Message for each processed account. Messages contains the detailed responses.
For each account, userXpress applies account fields first, then roles, then parameters. If SAP rejects one stage, later stages for that account are skipped. Earlier successful stages remain in effect, and processing continues for the other accounts.
The review uses SAP values read when you choose Review Changes. To replace an older preview after other administration work, choose Change Selection and run Review Changes again.
Read and save the results
Use the Messages tab to interpret a result or identify the fields to correct:
- Success identifies a successful SAP response.
- Warning identifies a SAP warning or an additional problem, such as a failed table refresh.
- Error identifies validation, comparison or update failure. The message explains the affected account or workbook row.
- Information contains other responses. A message that SAP returned no messages is informational, rather than confirmation of a particular change.
The Users tab summarizes the most severe SAP update response for an account. Refresh warnings appear separately on Messages, alongside all of the SAP responses. The message columns include the account identity, Row, Type, ID, Number and Message. The SAP message identifiers help locate a reported error.
Choose Copy Messages to copy the displayed message rows, or Export Messages to save them to an .xlsx file.
A refresh warning is separate from the SAP update result. Use Refresh in the Global User Table to reload affected accounts after resolving that warning.
To correct and retry an update, close Mass User Update, edit the workbook and open Import User Updates again. Run Review Changes against SAP before applying the remaining differences. This leaves already matching values out of the next update.
Stop an update
Choose Cancel and confirm Yes. The status changes to Stopping after active SAP changes finish…. userXpress finishes account work already in progress and stops starting further accounts.
Wait for the operation to finish. Completed changes remain in SAP. The final summary reports how many accounts were not started, or that cancellation arrived after all account changes had started. Use the retry procedure above to review what remains.