 Delorion
Make several account changes together
Combine password, locking, validity, authorization and default-setting changes for selected SAP accounts.
Applies to userXpress 2.0.0.0
Download PDF
- This pageMake several account changes together
- This sectionUsers
- Full manualuserXpress documentation
On this page
Use Multiple Change.. when selected accounts need the same combination of changes. For example, extend a contractor’s validity date and unlock their accounts in several clients, or change a team’s language and number formats.
Each enabled option applies to every selected account. For different values per account, prepare a Mass Changes workbook.
Apply a combination of changes
- Select the accounts in the Global User Table.
- Choose Users → Change → Mass → Multiple Change...
- If CUA Restriction lists accounts that cannot be changed from their selected client, choose Yes to continue with the permitted accounts. Choose No to cancel and change the selection.
- The Multiple Changes dialog opens after userXpress loads the common groups and licenses. Select the checkboxes for the changes to apply, then enter or choose their values.
- Choose OK to apply the enabled changes. Choose Close to leave without applying them.
All change categories start unchecked. The dialog starts with blank fields and default choices rather than each account’s existing values.
userXpress processes the accounts and refreshes their rows. The progress window shows Changing users: n/total. This counts processed accounts, including accounts with errors. See Read the results for the outcome of each requested change.
Example: extend validity and unlock
To restore access for a contractor whose engagement has been extended:
- Select the contractor’s accounts and open Multiple Change...
- Select Validity Dates and enter the new To date. Leave From empty to retain each account’s existing start date.
- Select Locking and choose Unlock.
- Choose OK.
Both changes are requested for each selected account. If SAP accepts one change and rejects another, the accepted change remains in effect.
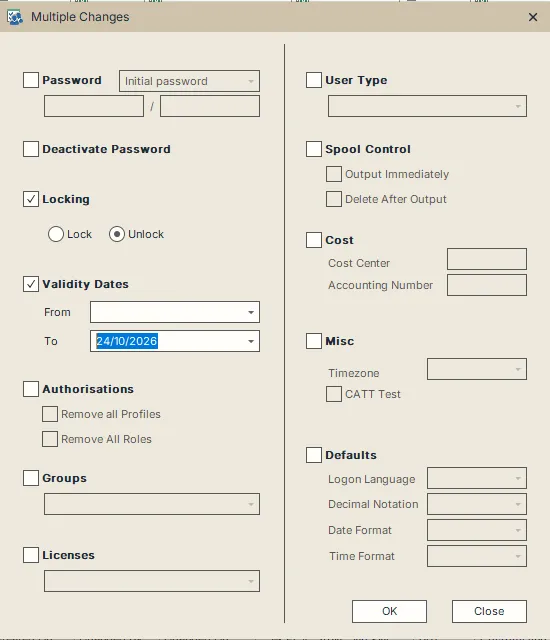
Locking and Validity Dates are enabled. Unlock is selected, and only the validity end date is filled in.
Password and locking
Password
Select Password, choose a password type and enter the same password in both password fields. The chosen value is applied to all selected accounts.
- Initial password is selected by default. Use it to reset access so a dialog user changes the password at their next password logon.
- Productive password sets the password for continued use without the initial-password change prompt. Use it when you need to assign the usable password directly.
Changing the password type clears both password fields. SAP’s password rules apply to each account. For the distinction between password types and the consequences of a failed productive-password reset, see Passwords, locks and access.
Deactivate Password
Select Deactivate Password to disable password-based logon for the selected accounts, for example when they use SNC single sign-on. Selecting it clears Password, and selecting Password clears Deactivate Password.
Locking
Select Locking, then choose Lock or Unlock. Unlock is the initial choice. Choose Lock to prevent account logon, or Unlock to remove the account lock as part of the combined change.
Validity Dates
Select Validity Dates to change when an account is valid:
- From sets the first valid date.
- To sets the last valid date.
- An empty date field retains that account’s existing date.
For example, enter only To when extending several accounts that have different start dates. If you enter both dates, From must be on or before To.
Authorisations
Select Authorisations, then choose the assignments to remove:
- Remove all Profiles removes the account’s assigned profiles.
- Remove All Roles removes the account’s assigned roles.
Use these choices when the selected accounts’ existing assignments are to be cleared. Each checked removal applies to all selected accounts. Leave a removal checkbox clear to retain that kind of assignment.
Removal is a separate part of the operation. A later failure to change another field does not restore assignments that SAP has already removed.
Groups
Select Groups and choose the user group for authorization checks, for example when moving accounts into another administration group. The list contains groups common to the selected clients.
This changes the group in the account’s logon data. To combine, replace or remove general group memberships, use Usergroup Management.
User Type
Select User Type, then choose the type that matches the account’s purpose:
- Dialog: a person signs in and works interactively.
- System: background processing or communication within a system.
- Communication: external RFC communication without interactive dialog logon.
- Reference (Logon not possible): supplies additional authorizations to other users. The account cannot sign in.
- Service: interactive access shared by a larger, anonymous group of users.
These purposes follow SAP’s user-type definitions. Selecting a different type changes how the account can be used. Leave the blank entry selected to retain each account’s type.
Cost
Select Cost to set Cost Center and Accounting Number. SAP uses the accounting number to allocate usage costs to an individual or group account. See SAP’s accounting-number explanation.
Enabling Cost replaces both values. An empty field clears the corresponding value in every selected account. Enter both values when both must be retained or set. If the accounts need different retained values, use separate selections or a Mass Changes workbook.
Defaults
Select Defaults to change the selected accounts’ SAP language or display formats. Choose values only for the fields you want to change. A blank list entry retains the existing setting.
- Logon Language sets the default language for SAP logon. The user can choose another language on the logon screen.
- Decimal Notation chooses the decimal and thousands separators, such as
1,234,567.89or1.234.567,89. - Date Format chooses the date layout, such as
DD.MM.YYYYorYYYY-MM-DD. - Time Format chooses 24-hour or 12-hour display, including the AM/PM style.
For example, select Defaults and choose Date Format only to standardize dates while retaining each account’s language and number format. SAP describes these settings in User defaults and options.
Spool Control
Select Spool Control to change the print defaults:
- Output Immediately selects immediate printing by default. Clear it to leave requests in the spool for later output.
- Delete After Output selects removal of the spool request after output. Clear it to retain the request.
Both checkbox states are applied when Spool Control is enabled. Set each to the required state, including a setting you want to retain. These are defaults for subsequent print requests. Users can change them in SAP’s print dialog, as described in SAP print personalization.
Misc
Select Misc to change CATT Test, Timezone, or both.
- CATT Test makes CATT save management data for each test-case run. Use it for accounts that need this record. See SAP’s CATT test-case reference.
- Timezone sets the account’s personal time zone. Choose the zone from the list. The blank entry retains each account’s existing zone.
Enabling Misc always applies the CATT Test checkbox state, including when you only choose a time zone. Set the checkbox to the required state for the selected accounts before choosing OK.
Licenses
Select Licenses and choose the SAP license classification to assign. Use this when the selected accounts need the same classification.
The list contains active license types common to the selected clients. Choose the intended named entry before applying the change. Leave Licenses unchecked to retain each account’s classification.
If the common group or license lists could not be retrieved, userXpress displays a message before opening the dialog. The other change categories remain available. To assign a value that exists in only one client, select that client’s accounts and open the dialog again.
Read the results
An account can have several results because role removal, locking and other changes are processed separately. To read its SAP messages:
- Select that account alone in the Global User Table.
- Right-click its row and choose Full Message.
Use the messages for the individual changes when deciding what to retry. The status bar shows the last reported message, which does not summarize every part of the operation. A row marked with an error also has a tooltip over its text cells.
Successful changes remain in effect when another change or account fails. Resolve the reported problem and repeat only the outstanding changes for the affected accounts.
If the display refresh fails after SAP changes finish, choose Refresh for the affected accounts to load their values before repeating a change.
Stop a running operation
Close the progress window to request cancellation. userXpress finishes work already started for an account and stops starting further accounts. Completed changes remain in effect.
Wait for the operation to finish. The status bar reports how many users were not started, or that cancellation was requested after all user changes had started. Unprocessed accounts can retain their earlier row messages. Refresh the intended accounts and use their values and Full Message results to choose any remaining changes.