 Delorion
Import and export role filters
Prepare role content filters in Excel, import them into My Queries and export saved definitions for reuse or sharing.
Applies to userXpress 2.0.0.0
Download PDF
- This pageImport and export role filters
- This sectionGlobal Role Table
- Full manualuserXpress documentation
On this page
Use a filter workbook to prepare several role content queries together or share a set of review criteria with another administrator. Import saves the definitions under My Queries. Choose a saved name there when you want to run it against connected SAP clients.
For a single query, the content editor is a convenient starting point. You can build it visually, save it and export it as an editable workbook.
Download the template
- In the Global Role Table, open Content Filter → Download Filter Template.
- Choose a destination for the
.xlsxfile and save it. - Open the workbook in Excel or the spreadsheet application you use for
.xlsxfiles.
The workbook contains:
| Worksheet | Use |
|---|---|
| Instructions | Explanation of the format and supported values. |
| Ruleset | An empty sheet for your filters. |
| Simple examples | Object/field conditions where rows are alternatives. |
| Advanced examples | Explicit groups, transactions, multiple fields and comparisons. |
Copy a complete example when starting a similar query. Keep the column headings unchanged. Columns may be rearranged because the importer identifies them by name.
Format SAP code cells as text so values such as 03 retain their leading zeros. Enter literal values rather than formulas.
Prepare a simple filter
Use the simple format when any one object/field condition should be sufficient for a role to match.
Each Step identifies one saved filter. Use a nonnegative whole number, such as 10, and repeat it on every row of that filter. Rule Description supplies its saved name.
For example, prepare a filter named User group activities 01 or 02 with two rows:
| Field | Value for the first row |
|---|---|
| Step | 10 |
| Rule Description | User group activities 01 or 02 |
| Type | AUTH |
| Auth. Object | S_USER_GRP |
| Auth. Field | ACTVT |
| Auth. Value | 01 |
Copy this row to make the second row. Change only Auth. Value to 02. The shared Step and description keep both conditions in one filter.
Leave Final and Transaction code empty. Keep advanced columns absent or empty for a simple filter.
Rows with the same Step are joined with OR. This example matches a role when it has an S_USER_GRP authorization covering activity 01 or activity 02. A role covering only 03 does not match.
A concrete Auth. Value uses Covers value, so maintained intervals or wildcards can satisfy it. In simple rows, a standalone * means any maintained value, including a stored blank. To search specifically for unrestricted coverage, use an advanced field row with Comparison → Covers value and Auth. Value *.
The supported simple types AUTH and ENGI use the same object/field matching rules.
Prepare an advanced filter
Use the advanced format for AND conditions, nested alternatives, transaction conditions, explicit comparisons or negation.
Three row kinds describe the definition:
- Group joins its children with AND or OR.
- Condition adds an authorization object or a transaction condition to a role-level group.
- Field adds a comparison inside one authorization object condition.
Group ID, Parent Group ID and Object Condition ID connect the rows. They are names you choose for the parts of this filter, such as R, A and F. Keep them unique where they identify different parts of the same Step.
Example: two fields in the same authorization
This query finds roles with an S_USER_AGR authorization covering activity 02 for role name Z_FINANCE:
And
  Authorization Object = S_USER_AGR
    And
      ACTVT covers 02
      ACT_GROUP covers Z_FINANCE
Copy the complete Same authorization - AND fields example from Advanced examples, or create these five rows in Ruleset. On every row, set Step to 20 and Rule Description to Finance role maintenance.
- Create the role-level group: Row Kind
Group, Group IDR, Group OperatorAND. - Add its object: Row Kind
Condition, Condition TypeAuthorization Object, Group IDR, Object Condition IDA, Auth. ObjectS_USER_AGR. - Create the object’s field group: Row Kind
Group, Group IDF, Group OperatorAND, Object Condition IDA. - Add the activity: Row Kind
Field, Group IDF, Object Condition IDA, Auth. FieldACTVT, ComparisonCovers value, Auth. Value02. - Add the role name: Row Kind
Field, Group IDF, Object Condition IDA, Auth. FieldACT_GROUP, ComparisonCovers value, Auth. ValueZ_FINANCE.
Leave unused cells empty. Both fields belong to object condition A, so they must match together within one maintained authorization.
Add alternatives within the object
To accept either Z_FINANCE or Z_SALES while still requiring activity 02:
- Add a Group row with Group ID
CHOICES, Parent Group IDF, Group OperatorORand Object Condition IDA. - Change the ACT_GROUP field row’s Group ID from
FtoCHOICES. - Copy that field row and change its Auth. Value to
Z_SALES. - Keep the ACTVT row in group
F.
The activity requirement and the alternatives now remain within the same object condition. A role with activity 02 and either role name in one authorization matches.

The five field-group rows link group CHOICES to parent F. All five belong to object condition A. The role-level group and authorization-object row are defined above.
Add transaction conditions
For a transaction condition, set Row Kind to Condition, choose Transaction Authorization or Menu Transaction under Condition Type, and place it in a role-level Group ID. Enter the comparison and the first value in Transaction code.
Use Transaction Authorization with Covers value when looking for S_TCODE coverage, for example VA01. Use Menu Transaction with Equals when looking for that code in a role’s menu.
Workbook field reference
Filter identity and structure
| Column | Meaning |
|---|---|
| Step | Whole-number identifier for one filter within the worksheet. Repeat it on the filter’s rows. |
| Rule Description | Saved filter name. Repeat the same description within its Step. |
| Row Kind | Group, Condition or Field in an advanced filter. |
| Condition Type | Authorization Object, Transaction Authorization or Menu Transaction on a Condition row. |
| Group ID | The group’s own ID on a Group row, or the containing group on a Condition/Field row. |
| Parent Group ID | The containing group for a nested Group row. Leave it empty for a root group. |
| Group Operator | AND requires every child. OR requires at least one child. |
| Object Condition ID | Identifies an object condition and connects its field groups and field rows. Leave it empty for role-level groups and transaction conditions. |
| Negate | Yes reverses the result of the row or group. An unresolved result remains unresolved. |
Each filter needs one role-level root group. Each object condition also needs one field root group. Nested groups must stay within their role or object scope.
Conditions and values
| Column | Meaning |
|---|---|
| Auth. Object | Authorization object name or supported name pattern. |
| Auth. Field | Field name or supported pattern inside that object. |
| Auth. Value | The first field comparison value. In advanced Field rows, an empty value is a literal blank. |
| Comparison | A supported comparison from the workbook’s list, such as Equals or Covers value. |
| Transaction code | The first comparison value for a transaction condition. |
| Value To | The second bound for Is between or Is not between. |
| Type | AUTH or ENGI for simple rows. |
| Final | Leave empty. |
For Is any of and Is none of, enter a list of quoted text values, such as ["01","02"], in the first value cell. Keep the quotes even for numeric-looking SAP codes.
For a coverage interval, choose Covers value and enter 01..03 in the first value cell. For a text comparison between two bounds, choose Is between, enter 01 in the first value cell and 03 in Value To. See Comparisons and values for their different meanings.
Saved column criteria
An exported workbook also contains Column Filter and Column Filters Enabled. These preserve the saved query’s ordinary table criteria and their Yes/No enabled setting. Keep them unchanged when exchanging an existing query. New simple filters have no column restriction.
These settings can be supplied on the filter’s first row. If repeated on other rows, the values must agree.
Import the workbook
You can import and save definitions before connecting to SAP.
- Choose Content Filter → Import Filters and select the
.xlsxworkbook. - If it contains several filter worksheets, choose the one to import and click Continue.
- Select the individual filters, or choose Select all supported.
- Select a row to read its condition preview.
- Edit Save as when you want a different saved name.
- For an existing name, either rename the incoming filter or explicitly select Replace for that row.
- Choose Import selected rules.
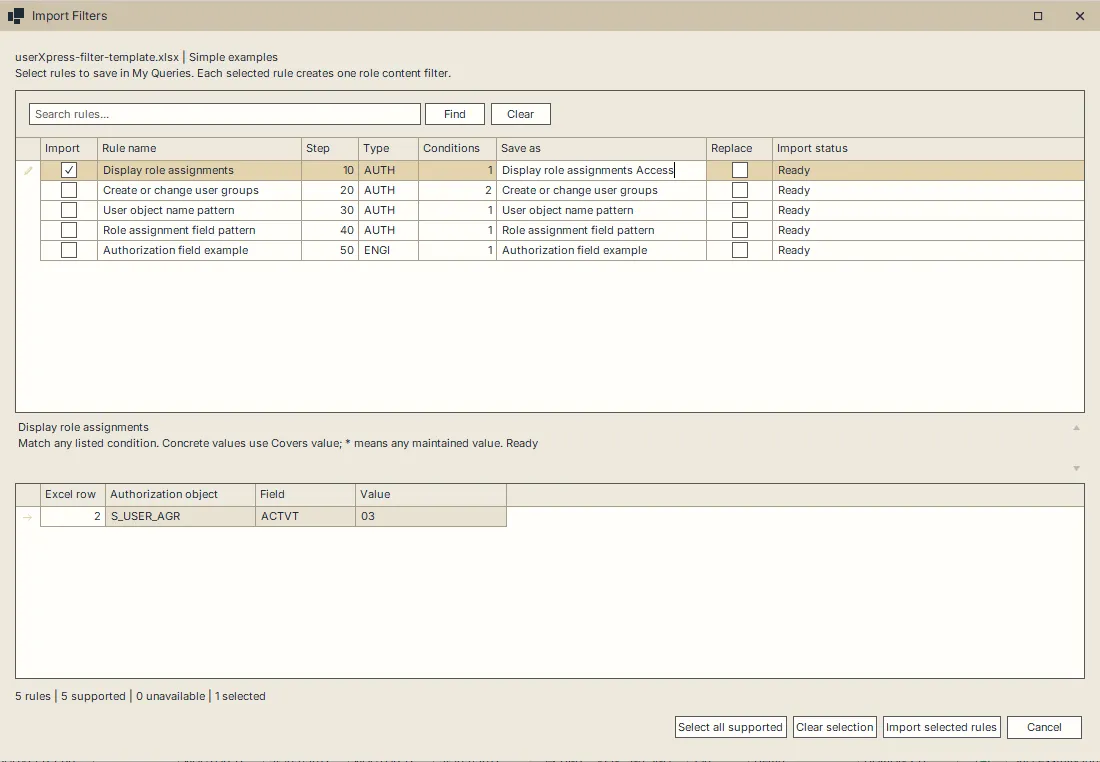
One rule is selected for import. Its Save as name is being changed, and the lower pane shows its activity 03 condition.
The completion message reports how many filters were saved. They appear under My Queries. Choose a name there to run the filter against the connected clients.
If an import replaces the saved definition of the currently open query, the working query remains as it was and can show Modified. Open the saved name again to use the imported definition.
Correct an unavailable filter
The import window identifies the affected row and the reason a filter is unavailable. Correct that row in the workbook, save it and import again.
Common corrections include:
- Restore a missing or misspelled heading.
- Use a literal cell value instead of a formula.
- Give different groups or objects different IDs.
- Point a child row at an existing group in the same scope.
- Complete an empty group or remove it.
- Use either simple rows or advanced rows throughout one filter.
- Clear a value from a cell that does not apply to that row kind.
Every condition in a filter must be valid before that filter can be saved. Other supported filters can be selected independently.
Export saved filters
- Save the queries you want to share under My Queries.
- Choose Content Filter → Export Filters.
- Select the saved role content filters, or choose Select all.
- Choose Export selected filters, select a destination and save the workbook.
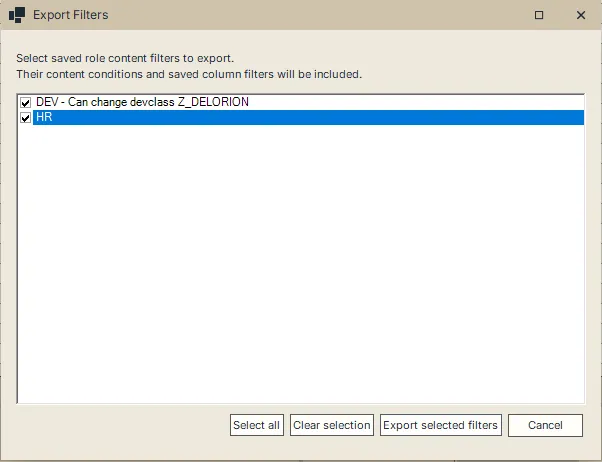
The workbook contains instructions and editable advanced rows. It preserves content conditions, their grouping and negation, and the saved ordinary column criteria. Use Import Filters to bring those definitions into another userXpress profile.
The export list contains queries with role content. To export a list of matching roles instead, use the Global Role Table’s Export command.